So this is a belated post because I actually did this craft about a month ago! I saw a few crafty/DIY ideas for jewelry holders that included stretching crocheted fabric or lace on embroidery hoops, or framed chicken wire as an earring holder. So I combined some of these ideas and added a few of my own, and VOILA! A lovely, well-organized jewelry display!
I used black tulle because I had some sitting around, but I will eventually re-back this with lace which I think will be a little sturdier and also look better. I draped necklaces that were too long to hang inside the frame over the corners. I added an extra corner of fabric on the top left for easy access to stud earrings. I also added a magnet to hold bobby pins and a place to hang hair ties. The ring holders are actually those foamy things you put between your toes for after a pedicure, I just painted them black. I was trying to find the kind that don't have flowers on the top because its easier to get the rings on and off, but I couldn't find any.
The whole project cost less than $5 because I already had the tulle and the jewelry, I just had to buy the foamy toe things. I found the frame at a thrift store for $2! I love ornate, somewhat gaudy, gold frames! BONUS: I also did a little kitty photo shoot with the frame before I started ;)
Friday, August 24, 2012
Saturday, December 10, 2011
Hello Again!
I have more to share, as I just can't seem to get enough of re-styling and crafting lately. I'm still quite the novice with the sewing machine, but after this cut-out dress project, I feel a little prouder of my seamstress skills -- pitiful though they may be. Both of these projects, one old, one brand new, were ideas from the wonderful A Pair and a Spare, and apparently the theme of of the two is: cheap.
Old project: Rug Mini Skirt

I picked up two rugs from the dollar store, traced the outline of a stretchy skirt I own onto one, stacked them, sewed them together, and cut off the extra. Turns out, my rugs are not quite as stretchy as the ones featured on the original blog, so the lack of zipper makes for a shimmy-in kind of fit, but also for a slimming effect, as it sucks you in nicely. Being made from rugs, and quite snug, I found it's a warm garment, so I've saved it for cooler weather...
New project: Cut-Out Dress


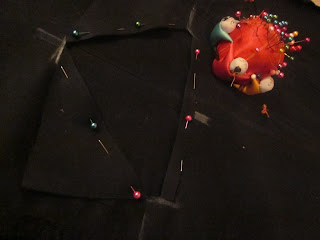
This started as another amazing $0.50 thrift store find -- I was not about to invest money in a dress I was going to cut holes in without any promise of success. A somewhat boring Ann Taylor LBD that I shortened and took in with my first attempt at darts -- worked out alright. Then I followed the borrowed directions of cutting a T shape to create the triangle cut-out for the front. Pretty simple overall. Certainly changed up this would-be conservative dress to something a little edgier.
Combined cost of these projects: $2.50 (+ time & patience)
How crazy is that?
Thrifted Sweater Re-Vamps
Thanks to inspiration from amazing DIY blogs like apair-andaspare.blogspot.com and my own refusal to buy something when I could so obviously make it myself, I was able to give new life to a couple of homely old sweaters. These hot little numbers set me back a whopping $0.50 a piece, plus about a dollar in lace for the one (now that I have been introduced to the amazing Mill End fabrics!).

This sweater skirt was born from a men's wool sweater. To get an approximation of the size and shape I wanted, I laid a stretchy skirt I already had on top, lining up the hem with the bottom of the sweater, allowed room for seams, and cut. Then I sewed it together, tried it on, and unfortunately had to take it in a bit before I got it right. I used some leftover elastic for the top, just adding it into a tunnel I sewed, as you would for a drawstring, and then sewed it closed. Voila, a trendy and comfy sweater skirt on the cheap, and uniquely yours.


The grey sweater looked very granny-style to start with. It's super soft, but was rather shapeless, so I took it in along the sides to make it more fitted, and then added the lace along the side seams. Piece of cake.
Tuesday, August 16, 2011
Crafty Gifts & Such


Here's some stuff I recently made and/or recently rediscovered and got around to photographing. Overall, it can be summed up as the product of Forever 21 re-purposing, vintage pieces, and whatever can be found in my closet of crafty goodness all mashed together. I love when you can mash stuff together and it comes out all pretty. The earrings, pearl necklace, and headband with the sparkly button flower will all find new homes with some August birthday girls. The green headband with the black flowers (which I salvaged from a pair of baby sis's shoes by the way) is all mine.
Sunday, April 17, 2011
Furlough Friday = Crafty Friday!


I put my Friday off of use and crafted away! Here's what I came up with:
For my first project I found a $0.

97 long sleeve

tee from

Old Navy, chopped off the sleeves, & made them into bows that I sewed onto the newly cut cap sleeves. I stole this idea (and even found the exact shirt) from http://caitscreates.blogspot.com/2011/03/feature-boring-to-wow-t-shirt-tutorial.html Super easy, and a fun nautically-inspired summer look.
The next project idea came from a blog called Dear Lizzy. The white shirt was a $1.97 ON number that started off XXL, but I cut down the sides and re-sewed it to my liking. With the extra I fabric I cut strips, pinned, and sewed on ruffles. I did the same with the grey shirt, though this was just a boring old thing from my closet that had been doomed to pajama wear. Voila! New life! Check out my $11 outfit with my custom new white tee and $9 BCBG pants ;)
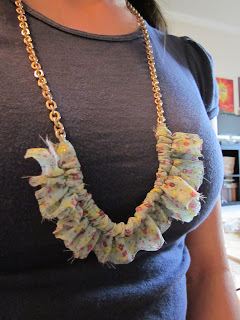
Last of all, on this ruffle-theme, I took a chain I found on the $1 table at the Sac Antiques Fair, and some scrap fabric and finally completed a project I had bookmarked ages ago from http://lillyella.blogspot.com Pretty straightforward project, but I really like the combination of soft fabric with chunky chain.
Be on the lookout for ruffle shirt gifts next Christmas ;)
Monday, October 25, 2010
Don't buy that, I can make that...and I actually did!


On the theme of one of our favorite mantras, I'll share a couple pieces I made. Perhaps not too amazing on their own, but amazing that I uncharacteristically followed through and actually made them as opposed to griping about the ridiculous price of an item that I could so obviously make if I so chose to. Also, rather green of me (though the term is getting a little old, I know, my poor favorite color) as I re-purposed materials.
J.B. you'll appreciate the fact that I found a new home for Professor Owl. He had a buddy before and they resided on some earrings, but, alas, there remains but one now. The inspiration came from those the mish-mash charm necklaces you see all over the place these days. They always make me think "I could totally make this." So, take some lone earring pieces tie them off with a bow, et voila, c'est magnifique, non? (As a side note, the necklace is modeled against a swap shirt and scarf. Bonus!)
I had similar bracelets on my wrists, ready to purchase at World Market, when I realized that I was about to spend something like $8 on three bracelets and I could probably pick up a whole pack of bangles for half that and finally use up some of the fabric scraps in my closet. That's how these little guys were born. I added flowers and some vintage buttons to the plain one to copy the corsage bracelets I've seen around lately. It's wandering away from the simplicity I liked initially, but it was fun to play with. I made the mistake of inattentively buying bangles that are all attached, so the process would probably be simpler if I didn't have to cut each one, but it works. Just something to bear in mind if anyone else is interested...
Thursday, October 14, 2010
Swap Success Story :)

My sister appreciates your clothes! While not present at our last swap, she was able to benefit. As a big Gama-Go fan, she was very excited about the hoodie and t-shirt. The t-shirt looks super cute! She sends her thanks :)
Oh, and I didn't get a picture of it, but she also looked adorable in the copperish colored turtleneck t-shirt with the three buttons on the back of the neck. I don't know who put that one in the pile but it looks great on her!
Subscribe to:
Comments (Atom)


